Chocolate Lasagna Recipe: 3 Pro Tips for Perfect Results
Picture this: layers of rich, creamy chocolate goodness stacked high like the most indulgent dessert lasagna you’ve ever dreamed of. Chocolate lasagna isn’t just a dessert – it’s pure magic on a plate that transforms simple ingredients into something absolutely extraordinary. This no-bake wonder combines the comfort of traditional lasagna with the irresistible allure of chocolate, creating a dessert that’s both familiar and delightfully surprising.
Here’s a fun fact that’ll blow your mind: chocolate lasagna actually originated in Italian-American kitchens during the 1980s when creative home bakers wanted to put a sweet spin on their beloved savory classic. The genius lies in its simplicity – you get all the satisfaction of a complex layered dessert without turning on your oven or spending hours in the kitchen.
What makes this chocolate lasagna truly special is how it brings families together around the dessert table. It’s incredibly easy to make, requires just 20 minutes of prep time, and feeds a crowd without breaking the bank. Unlike our popular Tiramisu Cheesecake recipe that requires precise timing and temperature control, this chocolate lasagna is virtually foolproof and perfect for beginner bakers.
Get ready to become the dessert hero of every gathering – this recipe will have everyone asking for seconds and begging for your secret!

Why You’ll Love This Chocolate Lasagna
Effortless Elegance That Wows Every Time This chocolate lasagna delivers restaurant-quality presentation with absolutely zero baking skills required. The gorgeous layers create a stunning visual impact that makes it perfect for dinner parties, potlucks, or any time you want to impress without stress. Each forkful reveals distinct layers of texture and flavor that dance on your taste buds – from the satisfying crunch of chocolate wafers to the silky smoothness of pudding and the airy lightness of whipped cream.
Budget-Friendly Luxury Dessert Making chocolate lasagna at home costs a fraction of what you’d pay for a similar dessert at a bakery or restaurant. With simple pantry staples and affordable ingredients, you can create a dessert that serves 12-15 people for under $15. Compare that to our Chocolate Lava Cake recipe, which serves only 4 people and requires premium chocolate – this lasagna gives you maximum impact for minimal investment.
How to Make Chocolate Lasagna
Key Ingredients for Chocolate Lasagna
For the Base Layer:
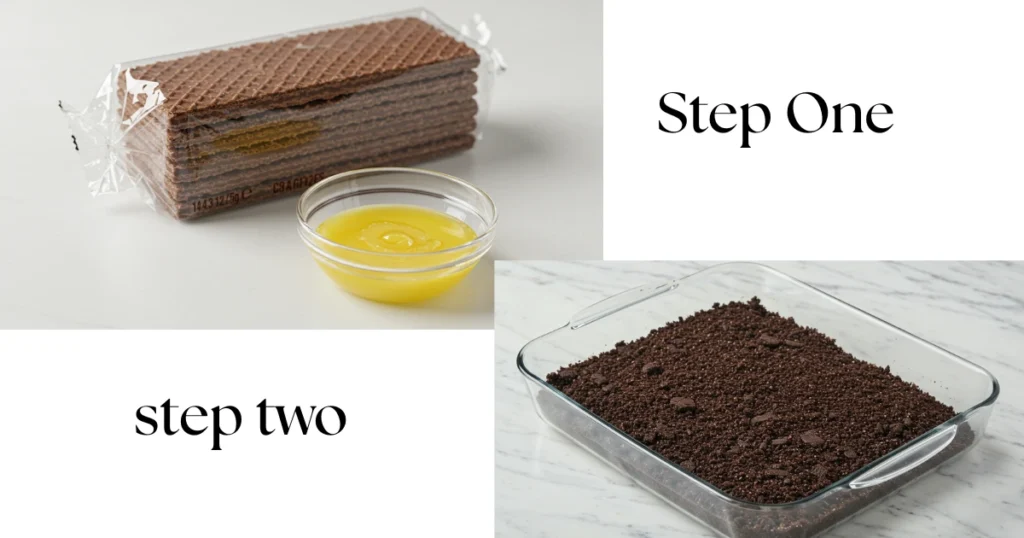
- 1 package (14.3 oz) chocolate wafer cookies
- 4 tablespoons melted butter
For the Cream Cheese Layer:
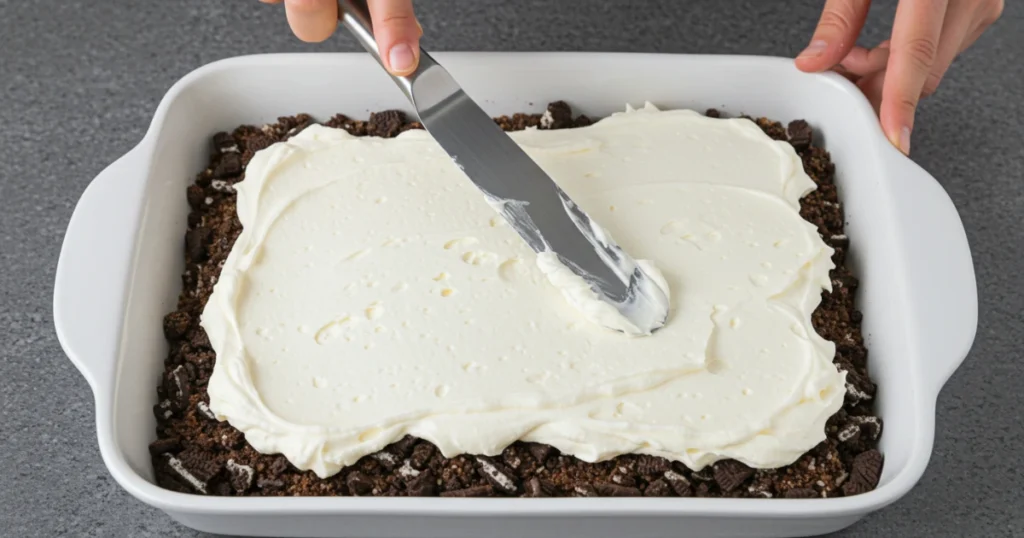
- 8 oz cream cheese, softened
- 1/2 cup powdered sugar
- 2 tablespoons milk
- 1 container (8 oz) whipped topping, divided
For the Pudding Layer:
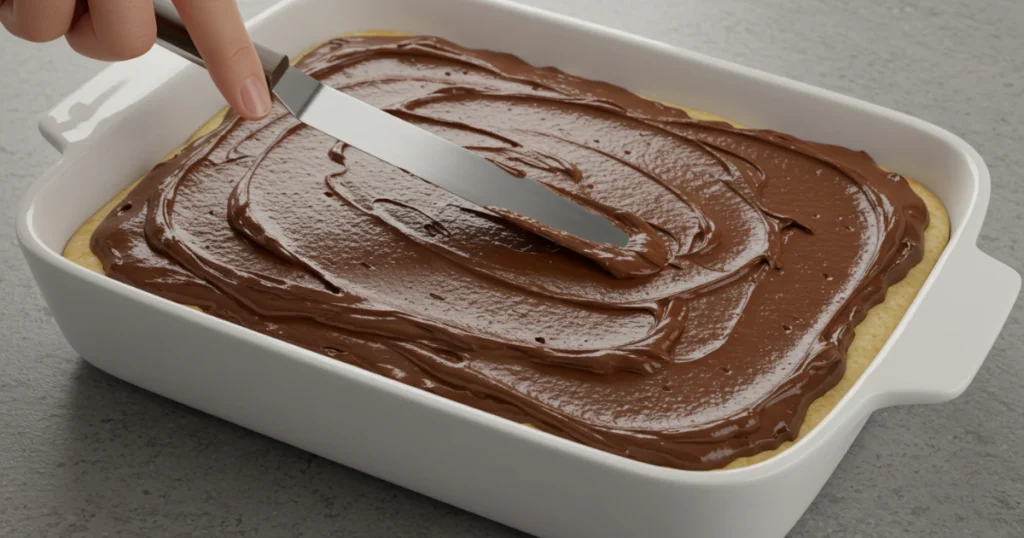
- 2 packages (3.4 oz each) instant chocolate pudding mix
- 3 cups cold milk
- 1 teaspoon vanilla extract
For the Topping:
- Remaining whipped topping
- 1/2 cup mini chocolate chips
- 1/4 cup crushed chocolate wafer cookies
- Chocolate shavings (optional)
Step-by-Step Instructions
Step 1: Prepare the Cookie Base Crush the chocolate wafer cookies into fine crumbs using a food processor or by placing them in a sealed bag and crushing with a rolling pin. Mix the cookie crumbs with melted butter until evenly moistened. Press half of this mixture firmly into the bottom of a 9×13-inch dish to create your first layer. Reserve the remaining crumb mixture for later layers.
Step 2: Create the Cream Cheese Layer In a large mixing bowl, beat the softened cream cheese until smooth and fluffy, about 2-3 minutes. Gradually add powdered sugar and milk, beating until well combined. Gently fold in 1 cup of whipped topping until the mixture is light and airy. Spread this creamy layer evenly over the cookie base.
Step 3: Make the Chocolate Pudding Layer In a separate bowl, whisk together the chocolate pudding mix, cold milk, and vanilla extract for 2 minutes until thickened. Let it sit for 5 minutes to fully set. Carefully spread the pudding over the cream cheese layer, ensuring even coverage without disturbing the layer beneath.
Step 4: Add the Second Cookie Layer Sprinkle the remaining cookie crumb mixture evenly over the pudding layer, creating a delightful textural contrast. Gently press the crumbs slightly into the pudding to help them adhere.
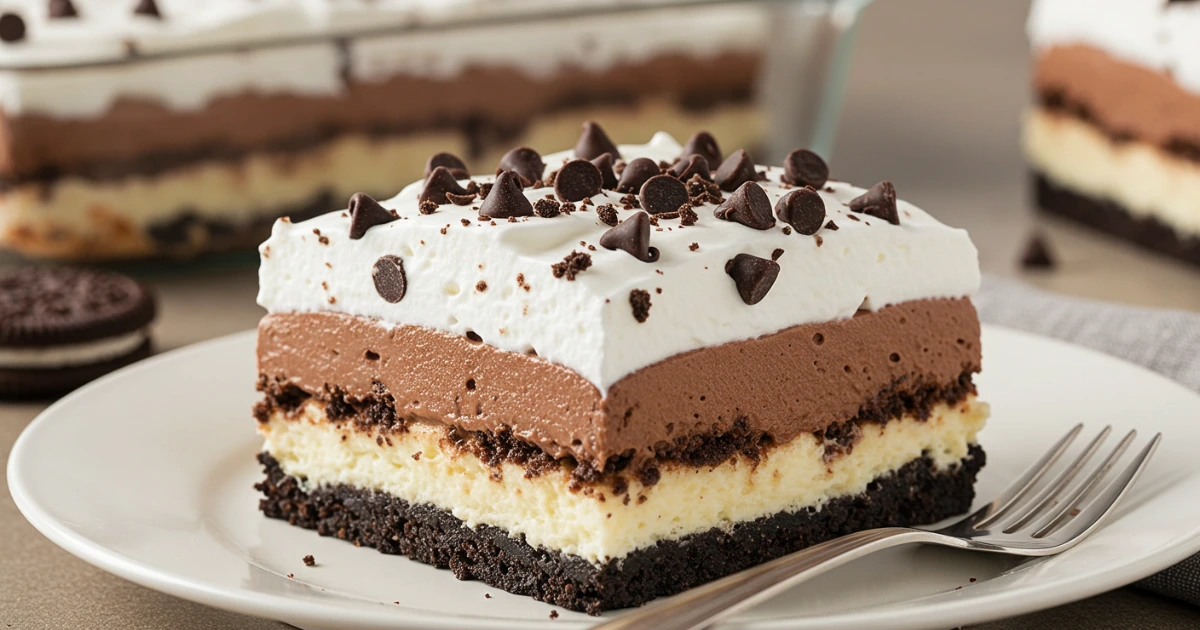
Step 5: Final Topping and Chill Spread the remaining whipped topping over the entire dessert, creating smooth, even coverage. Sprinkle with mini chocolate chips, crushed cookies, and chocolate shavings for a beautiful finish. Cover and refrigerate for at least 4 hours or overnight for best results.
What to Serve Chocolate Lasagna With
Perfect Beverage Pairings Chocolate lasagna pairs beautifully with hot coffee, cold milk, or a rich hot chocolate for the ultimate chocolate lover’s experience. For adult gatherings, consider serving it alongside Bailey’s Irish Cream, Kahlua, or a nice port wine that complements the dessert’s richness.
Complementary Side Options Fresh strawberries or raspberries provide a bright, acidic contrast that cuts through the dessert’s richness perfectly. Vanilla ice cream or a dollop of fresh whipped cream adds an extra layer of indulgence. For texture contrast, serve with crispy wafer cookies or delicate butter cookies on the side.
Elegant Presentation Ideas Garnish individual slices with a drizzle of chocolate sauce, a sprinkle of cocoa powder, or a few fresh mint leaves for a restaurant-quality presentation that elevates the entire dining experience.
Top Tips for Perfecting Chocolate Lasagna
Pro Tip #1: Master the Moisture Balance The secret to perfect layers lies in controlling moisture content. Always use cold milk for your pudding and ensure your cream cheese is properly softened but not warm. Pat any excess moisture from your whipped topping before layering to prevent soggy cookies. If your cookies seem too dry, lightly brush them with milk before layering.
Pro Tip #2: Perfect Your Layering Technique Use an offset spatula to spread each layer evenly without disturbing the layer beneath. Start from the center and work outward in gentle, smooth motions. For ultra-clean layers, chill the dessert for 30 minutes between adding each layer – this prevents mixing and ensures distinct, beautiful layers in every slice.
Pro Tip #3: Timing is Everything Allow each pudding layer to set for exactly 5 minutes before spreading – too soon and it won’t hold its shape, too late and it becomes difficult to spread smoothly. The final chilling time is crucial; 4 hours minimum allows flavors to meld and textures to set perfectly, but overnight chilling creates the ultimate texture.
if you like this recipe try my diffrent other easy resipe like Angel Food Strawberry Cake Dessert